Monday, February 22, 2010

Make Your Own Custom Sew-in Labels


I make my own sew-in labels for my plush monsters & I know that there are lots of other crafters out there who’d like to make their own labels as well. It’s really rather easy, so I thought I’d take it step by step and explain it for you all. If you have any questions about this, please don’t hesitate to ask!


You’ll need:
- Inkjet printer photo fabric. I like Blumenthal Crafter's Images PhotoFabric Cotton Poplin (6 sheets for $12) I’ve had trouble finding it to buy online, but I got it at my local Joann’s store. There are other similar products, but I haven’t tried them all myself…
- Inkjet printer
- Computer
- Microsoft Word, or other program
- Water
- Scissors
- Iron
- Ironing board
- Fray Check (glue-like liquid that prevents the fabric from fraying)
- Small container (for Fray Check)


OK, let’s get started…


1. Design label on computer. (Honestly, this is the hardest part)

I used Microsoft Word and made a template by inserting a table with 20 columns & 11 rows onto a landscape page. This will produce a sheet 55 double-sided, folded tags (5 across & 11 down).
It will take multiple cells in your table to create one tag (4 columns by 1 row for each tag). That’s one cell on each side for seam allowance, with two cells in the center with your logo/text.
Use the Text Direction option to make the text face the appropriate directions (away from each other at the fold. (Layout à Alignment à Text Direction)
Don't forget to leave the white space to actually sew into your item. I also included a line down each column showing me where exactly to cut it later to make it the right size. (To do that I used the Draw Borders option on the Design tab (Design à  Draw Borders à  Draw Table (with pen))


2. You'll definitely want to test printing it out on regular paper until you get it perfect; it took me a few tries.


3. Print out your design on the special fabric paper. Make sure you tell your printer that it’s special paper. It’ll jam easily, otherwise.
4. Carefully peel away the paper backing.


5. Rinse under running water (about 30 seconds, or until water runs clear).


6. Iron the fabric (you can wait for it to dry a little first, but I just start ironing it and it dries it for me!)
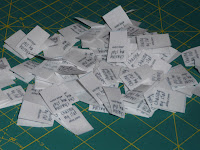
7. Cut along the lines making strips of labels.
Make sure you cut the strips so that there is a empty column on either side of your text. (blank column, left-facing text, right-facing text, blank column) CUT & so forth.


8. Fold each strip in half long-ways so that there is one set of text on each side of the fold. (This will make them double sided like you typically see.)


9. Carefully iron the fold in place – don’t get your fingers!
10. Cut out each individual label. (there might be excess fabric to trim off each edge).


11. Use a little bit of Fray Check on the raw edges to prevent fraying. This step may not be necessary if you choose a printer fabric "paper" that doesn't fray.


12. Let dry & they'll be ready to use! Just sew them into the seam as you go.

Have questions? Don't be afraid to ask!


Tuesday, February 9, 2010

A Little Bit About Me & My Snuggle Monsters

I thought you might like to know a little bit more about my monsters and me. So here we go…


I am an artist with a focus on giving back to the community. I design and hand-sew plush monsters which I sell through etsy.com (www.chasingmystar.etsy.com). I have a background in art and psychology, and have experience teaching art to children. I donate my time, talent, and monsters to various charities including Comfort Zone Camp and Spirit Jump (I've included some additional information about these organizations below).

I began making monsters when my sister introduced me to The Toy Society (http://thetoysociety.blogspot.com), which is a community of people who spread the love throughout the streets of the world by leaving handmade toys where some unsuspecting people can find them and take them home. I wanted to be a part of this awesome group of people so I started thinking about what I could make and somewhere along the way I started creating my Snuggle Monsters.

Each Snuggle Monster is a uniquely hand-made stuffed animal made out of luscious fleece material with hand stitched details. They are hand-crafted in a smoke-free home with all new materials and securely sewn with no buttons or other small parts. Every monster comes with an official Monster Birth Certificate & Biography Card with a story and customizable details.

I've been making these Snuggle Monsters in my “spare-time” since January, 2009 and thoroughly enjoy it. I love coming up with new designs and creating personalities for my monsters. It's exciting to see a new creation transform from a sketch on scratch paper to a vibrant and huggable stuffed animal made from gentle fleece. So far I've been extremely happy with how my monsters have turned out. It takes a lot of time to make each monster, but its fun work. I love making artistic and creative things, so it's been great to have a focus for my imagination. It keeps my creative mind working – I'm constantly sketching up new ideas.

I’ve also started creating little finger puppets with the scraps of fabric I have left over from my Snuggle Monsters. What’s especially great is that I’m now able to use fabric that would otherwise be discarded (or kept in an ever-building scrap pile). I’m excited about this new addition to the monster family! They’re silly & cute & fun to make! Each monster, alien, or creature is a uniquely handmade finger puppet made out of soft fleece material with hand stitched materials. Just like the Snuggle Monsters, they are hand-crafted in a smoke-free home with all new materials and securely sewn with no buttons or other small parts.

I am happy to make custom monsters if what you are looking for isn’t currently in my shop. Feel free to contact me with any questions or requests. mary@chasingmystar.com

A Little Bit About the Non-Profit Organizations I Support With My Snuggle Monsters

Spirit Jump is something I've gotten involved with this past year. It’s an amazing organization that aims to provide hope and comfort to people battling cancer, one gift at a time. Spirit Jump's goal is to help cancer fighters fight strong by providing uplifting cards and inspirational gifts from our "Jumpers" to help fighters maintain the strength they need every day as they battle this terrible disease. So far I’ve given monsters to a number of children who are either battling cancer themselves or their parent / sibling is battling cancer. I'm hoping that the monsters will be something that gives them a little bit of joy during such a hard time. Anyone who would like to get involved with Spirit Jump should go to the website to get more information.
http://spiritjump.blogspot.com/2008/12/welcome-to-spirit-jump.html (orwww.spiritjump.com)

Comfort Zone Camp is an amazing organization that I have been volunteering with for years. It's a national camp for children who have experienced the death of a loved one. I actually started as a camper, and have volunteered as a "Big Buddy" for years since. At this point I have given a few monsters to individual campers, and that is a great start, but I am hoping to be able to make enough monsters to give to all the children in one of the support groups that CZC offers. If anyone would like to make a donation to this cause they can buy a monster in my shop and include a message to the seller telling me that they'd like the monster to be donated to Comfort Zone Camp.
http://www.comfortzonecamp.org/campexperience

Questions? Just ask! I love these organizations and could talk about them for ages!

Tuesday, February 2, 2010

Introducing my newest addition to the monster family!

The newest addition to the family are monster finger puppets & I'm hoping to have some hand puppets on the way too! I'm excited to add these to my repertoire for a few reasons: 1. I have been hoping to add an inexpensive item to my shop that won't take too much time to make. 2. It's such a great use for all my fleece scraps. I don't need to buy any additional materials for these mini-projects. I get to use the little leftovers of fabric that would otherwise be discarded (or kept in an ever-building scrap pile). 3. They're cute & fun!

I have a nice little story about the finger puppets & one of the non-profit organizations I support…

I think I've mentioned Comfort Zone Camp before… Basically it's an amazing organization that helps children deal with the loss of a loved one. Children from around the country who have experienced the death of an immediate family member can attend a camping weekend (free of charge) to help them heal and grow. Comfort Zone Camps "create an environment where grieving children can have fun and break the isolation death often brings, while learning valuable coping skills for their daily lives."

At a recent camp, I was able to give each of the campers in my group a little monster finger puppet. It was so much fun. They each went around the circle and used the finger puppet to tell (in a cute monster voice) what their favorite part of the weekend was. The magic moment for me, was at the memorial service, when each camper in my group used their finger puppet to say "in memory of my [mom, dad, brother, etc.]" in front of the whole audience of campers, volunteers, & parents. It was so precious and touching.