I make my own sew-in labels for my plush monsters & I know that there are lots of other crafters out there who’d like to make their own labels as well. It’s really rather easy, so I thought I’d take it step by step and explain it for you all. If you have any questions about this, please don’t hesitate to ask!


1. Design label on computer. (Honestly, this is the hardest part)
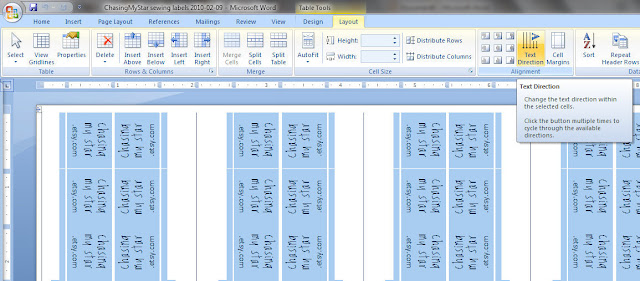
I used Microsoft Word and made a template by inserting a table with 20 columns & 11 rows onto a landscape page. This will produce a sheet 55 double-sided, folded tags (5 across & 11 down).
It will take multiple cells in your table to create one tag (4 columns by 1 row for each tag). That’s one cell on each side for seam allowance, with two cells in the center with your logo/text.
Use the Text Direction option to make the text face the appropriate directions (away from each other at the fold. (Layout à Alignment à Text Direction)
Don't forget to leave the white space to actually sew into your item. I also included a line down each column showing me where exactly to cut it later to make it the right size. (To do that I used the Draw Borders option on the Design tab (Design à Draw Borders à Draw Table (with pen))
2. You'll definitely want to test printing it out on regular paper until you get it perfect; it took me a few tries.

3. Print out your design on the special fabric paper. Make sure you tell your printer that it’s special paper. It’ll jam easily, otherwise.
4. Carefully peel away the paper backing.
5. Rinse under running water (about 30 seconds, or until water runs clear).


7. Cut along the lines making strips of labels. Make sure you cut the strips so that there is a empty column on either side of your text. (blank column, left-facing text, right-facing text, blank column) CUT & so forth.


8. Fold each strip in half long-ways so that there is one set of text on each side of the fold. (This will make them double sided like you typically see.)
9. Carefully iron the fold in place – don’t get your fingers!
10. Cut out each individual label. (there might be excess fabric to trim off each edge).


11. Use a little bit of Fray Check on the raw edges to prevent fraying. This step may not be necessary if you choose a printer fabric "paper" that doesn't fray.


